Tuesday, June 5, 2012

Tuesday Tutorial: Spice Rack Redo


I've become a little addicted to garage sales.  With the kids on break from preschool and Kids' Day Out, we have lots of time to kill.  Time that the kids are thrilled to fill with driving around town and looking at other people's junk.  Except, the crafting side of me shouts "That's not junk!  That's treasure!"  And a couple weeks back we hit the jackpot.  We found an estate sale brimming with vintage and antique items in need of a little TLC - for 75% off.  For $11 I walked away with a tiny vintage bench, a cute wooden crate, a gorgeous old magazine rack, and a counter-top sized spice rack. 


The only problem?  The spice rack was blue.  Bright blue. My kitchen accessories thus-far are white and stainless steel.  Not blue.  No problem - time for a little DIY touch-up and it would be good as new.  Easy peasy.  Almost.  Let's just say I learned a few lessons as I attempted this project - but I love the results.  Here's how it went:


1. Sand Off Old Paint 

I really didn't think this was going to be so hard.  It's just a little paint - right?  Wrong.  It was a lot of paint.  And it was powdery paint.  It got all over my skin, my clothes, the deck, the house.  My sand block was ruined.  And I didn't get off much of the color.  I gave it a good washing down and figured I'd just paint over it. 

Lesson Learned: Always sand off as much paint as possible.


2. Paint On Base Coat

So I got out a basic white acrylic paint to cover up the blue.  I thought a couple coats should do it. Not so much.  It was still very blue.

Lesson Learned: If your under color is dark, and you want your object to be light, use a thick primer paint, not something light and chalky like acrylic (which does much better on bare woods or when you want your dark base to show through).
 

3. Attempt Darker Base Coat

I wanted my final color to be ivory, and since my background was going to be a rust-colored paper, I figured a brown would be a good undercoat for the ivory.  That way, if it showed through the lighter paint, it would make a nice "shabby chic" effect that matched the backing.  Well, I was close.

Lesson Learned: Make sure your dark undercoat is the exact color you want to show through.  

After several coats of ivory paint, I decided there wasn't enough orange in my undercoat.  So, I mixed up a small batch of orangy-brown, dry-brushed on some streaks, then immediately blended with another coat of ivory paint. It's hard to tell in the terrible cell-phone photos, but the spice rack is now a nice "shabby" blend of rust and ivory.

4. Make Backing
5. Seal Backing and Spice Rack

To make the backing, I just used mod-podge to affix a piece of scrapbook paper to an old sheet of thin carboard.  I then gave both the spice rack and the backing a good coat of mod-podge to seal them up and make them easier to wipe down (this will be next to the stove after all).

Lesson Learned: Be careful with brushstrokes.  Make sure they go "with the grain" so they look natural.
 

6. Apply Backing


This step went exactly as planned.  Thumbtacks + rubber mallet = firmly affixed backing and no cracked wood.


7.  Enjoy The Finished Product


Not everything went exactly to plan, but I learned some important lessons, and I love my pretty little (cheap!) spice rack.  It fits just right on the counter, and I like the flowered background that peeks out at me when I remove a jar. 

Now I've got an even bigger project ahead of me.  Both boys have dressers that we snagged off Craigslist that are in serious need of refinishing.  Since they will soon(ish) have new rooms that I can actually decorate, I'm itching to give both dressers new coats of paint that match their new rooms' color schemes.  Keep an eye out for those before-and-afters soon!


 Stuff I LoveFacebookTwitterPinterestBloglovin

Monday, June 4, 2012

Stuff I Love: Poolside Part I

Summer may not technically be here yet, but here in Kansas it's been swimming-weather for a couple weeks already!  Heading to the pool can be a great way to spend time with (and wear out) the kids.  With the right gear, a day at the pool can be a safe and easy way to relax with the family.

Today I'm going to share with you some of my favorite poolside clothes and accessories for kids!

Kid's swimwear


1. UV Swimwear

Sure little kids in teeny bikinis are super cute.  But with all the info we have these days on the damage sun does to our skin - starting in infancy - we know we need to protect our little ones' precious skin.  My husband likes to tease me because I've gotten in such a habit of insisting my kids wear their UV shirts to the pool outside, they wear them to their indoor swim lessons, too!  If only I could get them to keep on their hats and sunglasses... (any advice there?).  And UV suits these days are very fashionable.  Baby L has both the sweet Target suits above, and the boys have their favorite tv characters emblazoned on their swimwear.  Win win!


2. Flotation Suits

Of course we would never dream of taking our eyes off the kids for even a second in the pool, nevertheless, as our kids are learning the basics of swimming, they're begging for more independence in the water.  They can't float on their own yet, but each boy has what he calls his "life pants" - a swimsuit with floaties sewn into the lining.  These suits keep their heads above water so they can kick and paddle (and race) across the pool without the assistance of Mom or Dad.  Clearly we're never more than an arms' length out of reach, but the boys feel so 'grown up' when they can swim by themselves.


3. Float Seat

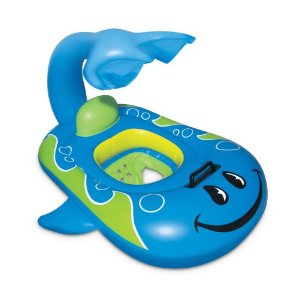
For baby L who hasn't mastered even the basics of swimming yet, we have a flotation seat, complete with canopy to shade her baby eyes from the sun (see previous note about hats and glasses).  She loves bobbing around in the water and thinks it's hilarious when Mommy or Daddy pushes her around the pool.  It keeps her off the stairs and lets her feel like a part of the family.  And she's already itching to learn to swim, just like her big brothers.


4. Sunscreen

We don't want to forget the most basic accessory of all!  Slather on that SPF (broad-spectrum preferably) to keep burns at bay and reduce their longterm risk of skin cancer.  And don't forget to apply some on yourself as well!  Organic sunscreen is great if you don't want to worry about the chemicals it contains (we love Burt's Bees and Alba Organics), but a busy mom with a big brood of kids might prefer a sunscreen that sprays on quickly instead.  Whatever you choose, don't skimp!  Most sources recommend a shot-glass size dollop of cream for an adult, slightly less for a child - or a double-spray if you're using the aerosol kind.

So, are you as excited as I am to hit the pool and soak up some sun (figuratively of course)?   Check back next week for my top recommendations for poolside toys and games.


 Stuff I LoveFacebookTwitterPinterestBloglovin

Saturday, June 2, 2012

Saturday Shop Hop: Blue (take 2)

Welcome to another Saturday Shop Hop!  Last week's theme was Blue. However, we had no linkups so we're going to try it again!  Therefore:

This week's theme:  Blue
Link up any and all of your blue items!  Nothing blue in your shop?  Link up anyway.  
Next week I'll be choosing a couple of submissions to display!
Be sure to visit each other's shops, and if you have a spot on your blog, be sure to post our new button!!  The more we share the hop, the more visitors we all get :)  Thanks all!

Saturday Shop Hop
<div align="center"><a href="http://www.babystuffilove.blogspot.com/search/label/Saturday%20Shop%20Hop" title="Saturday Shop Hop"><img src="http://i1227.photobucket.com/albums/ee435/mrscat206/SaturdayShopHop.jpg" alt="Saturday Shop Hop" style="border:none;" /></a></div>
Stuff I LoveFacebookTwitterPinterestBloglovin

Friday, June 1, 2012

A Look Back: 1984

Big thanks to The Houtz Party, Shaping Up To Be A Mom, Covered In Grace, and Absolute Mommy for hosting this linkup. 

Today we are taking a trip down memory lane to
 
1984

I was 2 years old (barely), therefore, I remember very little of the actual year.  So I'll help you remember the way I do - through the various photos my mother took (for which I am eternally grateful).  Here's what the early '80s looked like for me.

Grandpa, Little Golden Books, bangs, flowered dresses

I was loud.  Very loud.  Mom was an opera singer, I came by it honestly.
They were also gracious about hanging my scribbling all over the house.
 
 That kitchen. Brown stove.  Avocado fridge.  Dark, cramped, full of love and fun.  This kitchen makes me think of pork chops and 7-Up.

 I was eclectic.  Jogging suits with nail polish.  Sesame street was king. That mirror took all day to clean, but it made the room look HUGE.

 Grandma's cozy lap.  Grandma's cozy afghans.  More Little Golden Books.  More flowered dresses.  Grandma's house always smelled like freshly baked bread.

 Bicentenial Pond.  When playgrounds were made of wood and metal, not plastic.  Daycare kids in bell-bottoms and Stride Rite sandals.  Early New England summers still too cool for shorts.

 Second birthday.  The chocolate cake addiction has begun.  The ancient brown-leaf-print glasses and brown-leaf-print dishes.  Everything back then was brown, orange or green. Except Grandpa's shirt.  He wore blue shirts with green trousers every single day without fail.  I loved it.

 Summer was all about ice cream at Kathy John's.  And lots of ruffles.  

 I was very silly.  More orange and green furniture.  Even the carpet was orange.  That picture window was broken by large birds 3 times.  We spent countless hours playing around on that baby-grand.

 I liked to eat.  Which is probably why in later years I got chubby.  More '80s floral print.

New England winters were intense.  Had to be prepared.  More antique furniture (yep, that's a record player.  I remember when cassettes were "new and exciting").  More fun with the baby grand.


 Stuff I LoveFacebookTwitterPinterestBloglovin

Swap It To Me: Services

It's a new month!  Are you ready to swap?

Last month we swapped material goods.  A great way to clean out the things we no longer needed.  If you missed that one, don't worry, we'll be doing another "stuff" swap next month - so start working on that post while you do your spring cleaning!

THIS month, however, we're swapping services.  What does that include?  Pretty much anything non-material that you can do for someone else.  Blog sponsor buttons, blog design, photo editing, guest posting, editing a paper for school, helping someone advertise their shop/blog/business, sending a dozen homemade cookies (I guess that one is goods and services) - whatever online need you have, or service you can provide, you can link it up here.

Here are the rules:

1) Keep it clean and legal, please.
2) Be kind to one another.
3) Write a post about the service(s) you want to offer and/or the services you are looking to receive, and link it up here.
4) Alternatively, list your wants/offers in the comment section.
5) Grab a button and share the swap with others!

That's it!  Happy swapping!


Swap It To Me
<div align="center"><a href="http://www.babystuffilove.blogspot.com/search/label/Swap%20It%20To%20Me" title="Swap It To Me"><img src="http://i1227.photobucket.com/albums/ee435/mrscat206/SwapItToMe-1.jpg" alt="Swap It To Me" style="border:none;" /></a></div>

My swap wants this month:
1) Cover design for a couple facebook pages
2) Help promoting Operation Feed The Lambs (guest posts on your blog, OFL button on your side bar, etc)
3) Product reviews for my shop
4) Guest posters for the blog
5) I'm always looking to swap buttons for sponsoring

What I can provide:
1) 200x150 button slots on my sidebar
2) Product reviews for your shop
3) Guest post for your blog
4) Simple button design/html
5) Cookies

Let me know if you see something you want, or have something I want, or just want to chat - thanks!


Stuff I LoveFacebookTwitterPinterestBloglovin
Related Posts Plugin for WordPress, Blogger...