Showing posts with label Guest Posts. Show all posts

Friday, July 27, 2012

Just Jessica

Hi Readers! I am Jessica from Just Jessica  and I am delighted to share with you today on Cat's blog.

 I wanted to share about my definition of love. I have been thinking about this topic a lot because of all the summer weddings that have taken place lately. I find myself dreaming about my wedding day and the day that I will walk down the isle to marry my one and only. While love and marriage are beautiful things I believe that there are two definitions to love: The world and Religion. 

I tend to favor the religious view of love seeing as I am a Christian. But I also see the view of the world. I don't think that the world is wrong in their definition., love is a feeling yes. The love you have for your spouse or your boyfriend or girlfriend is something deep and profound. But to me love is just not a feeling. Love is an action. 
I believe in the Bible and I believe that Jesus died on the cross. He died for my sins and for yours. God sent his ONLY son to die for all of our sins no matter if we believe in him or not. He sacrificed his son so that we could have LIFE. He payed all of our sins so that we wouldn't have to do it ourselves. I was listening to a song the other day that was talking about how great it was that God is was willing to send his son. Because as the song says, it should have been each and every one of us that went to that cross for our sins. But it did not happen that way. It happened just the way that God intended. 

Yes love is a feeling but love is also a profound action of selflessness. The love of the world is something that is fleeting and based on feeling. While the Love that comes when one believes in Jesus is something that is everlasting and solid.

Wednesday, July 25, 2012

Measure Once Cut Twice


Hi there! My name is Hilary and I blog over at Measure Once, Cut Twice.  I'm honored to be guest posting on Stuff I Love today while Cat is away on vacation. If you visit my blog, you'll see that I'm pretty much obsessed with all things related to crafting.

I just opened up a new business called Measure Once, Cut Twice {The Shop}. It was created to help those crafters who don't have dye-cut machines {like a Silhouette or Cricut} bring their dreams to reality. We cut personalized images onto adhesive vinyl, card stock, or other specialty media for less than $.04 per sq. in.! Check it out here.

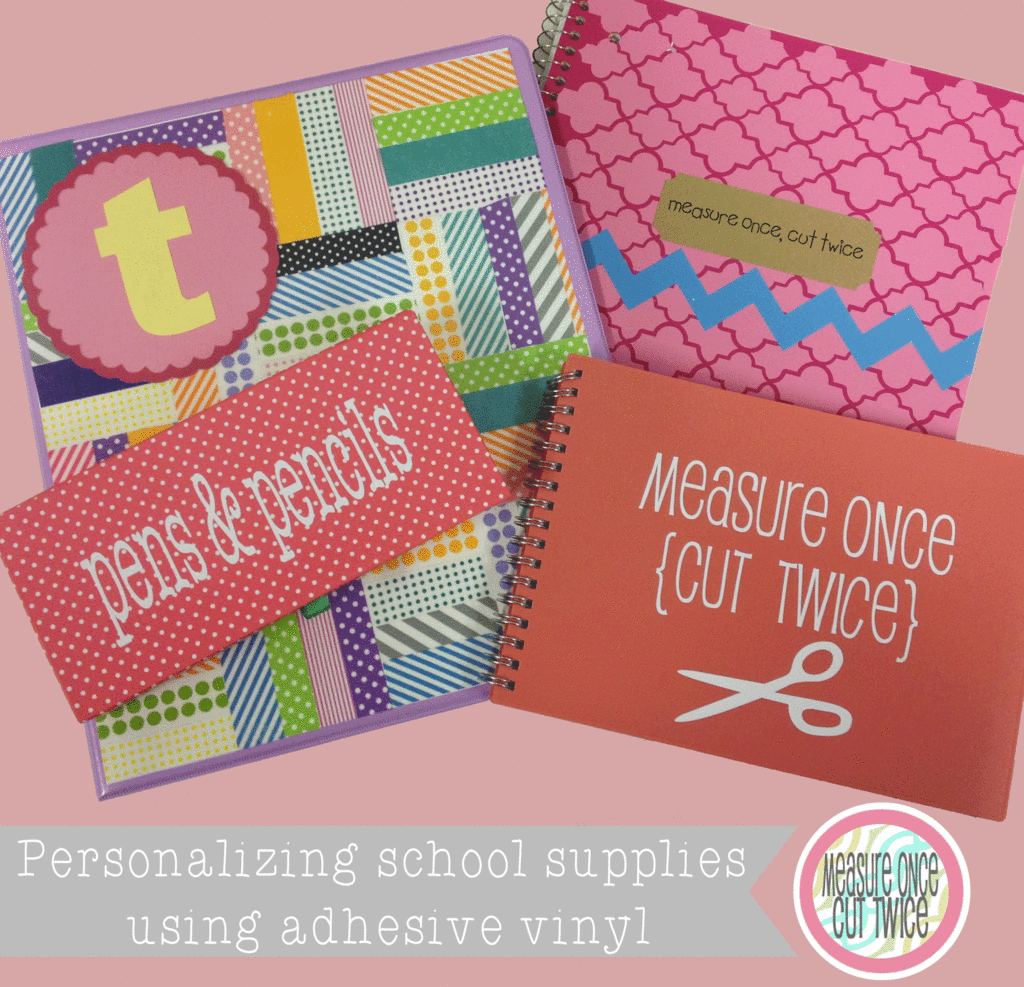
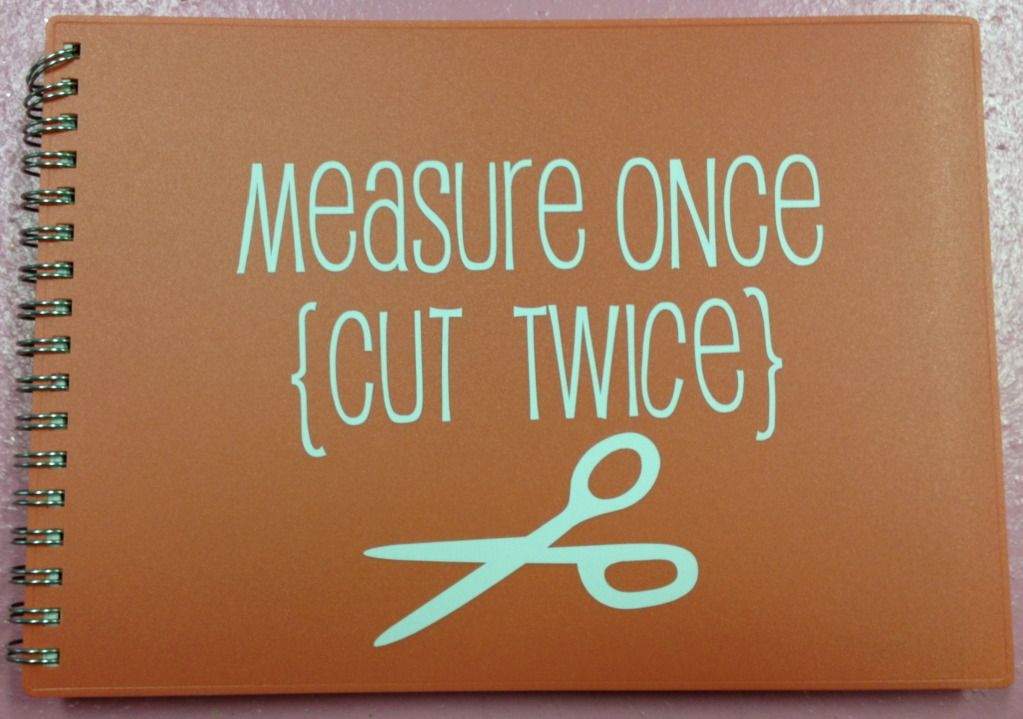
Today I'm going to show you some quick & easy ways to personalize children's school supplies using adhesive vinyl cut using a dye-cut machine.

{P.S. Stick with me, there is a little gift from me to you at the end of this post!}

Personalizing a spiral binder:


Tools
- Spiral binder
- X-ACTO knife
- Adhesive vinyl
- Transfer Paper
- Scraper tool (credit card works)
- Other decorative decals for personalization

Directions
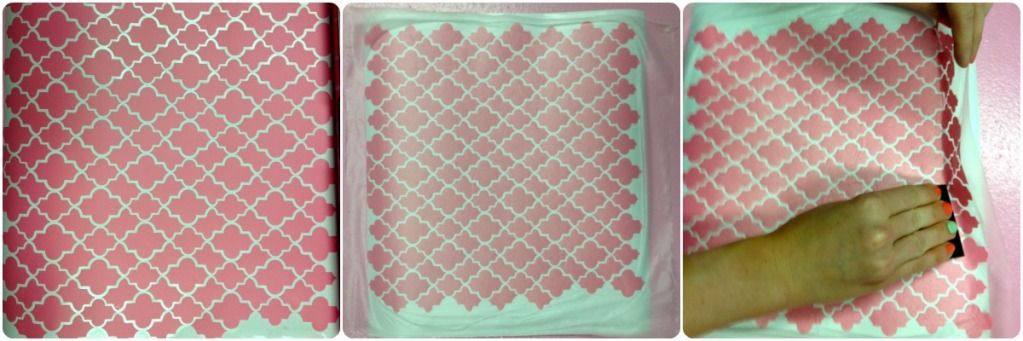
1) Print the pattern you want using a dye-cut machine onto your choice of colored adhesive vinyl. 
2) Apply transfer paper to the vinyl and use the scraper to make sure the transfer paper is completely attached to the top of the vinyl. 
3) Carefully begin peeling off the vinyl. Use your scraper tool to guide the vinyl as it comes off. Make sure there are no pieces left behind!
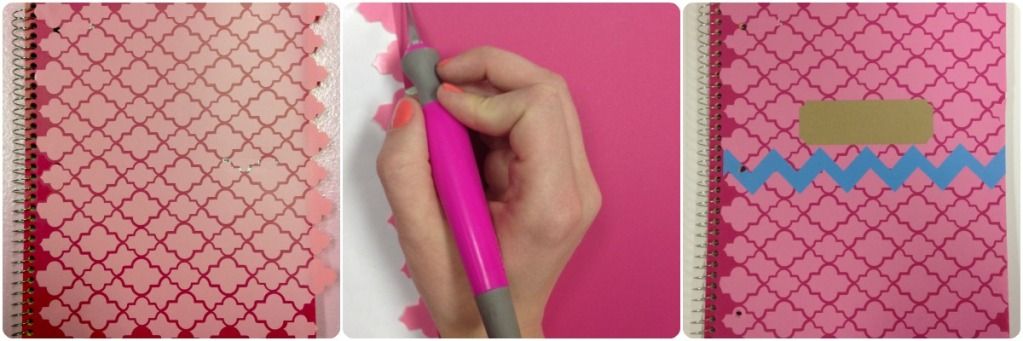
4) Apply your vinyl to the top of the spiral binder.
5) Use an X-ACTO knife to cut off any extra pieces from the edges. 
6) Add other details. I added a piece of blue adhesive vinyl and a brown label so that I could label the binder with my name. 

Personalizing a clear front covered binder: 


Tools
- White copy paper
- Washi tape (multiple colors)
- Scissors
- X-ACTO knife
- Other decorative decals for personalization

Directions
1) Start by measuring out how wide your clear front covered binder is. Mine was a little bit wider than a standard 8.5" x 11" piece of copy paper, so I taped two pieces of paper together to make it wider. 
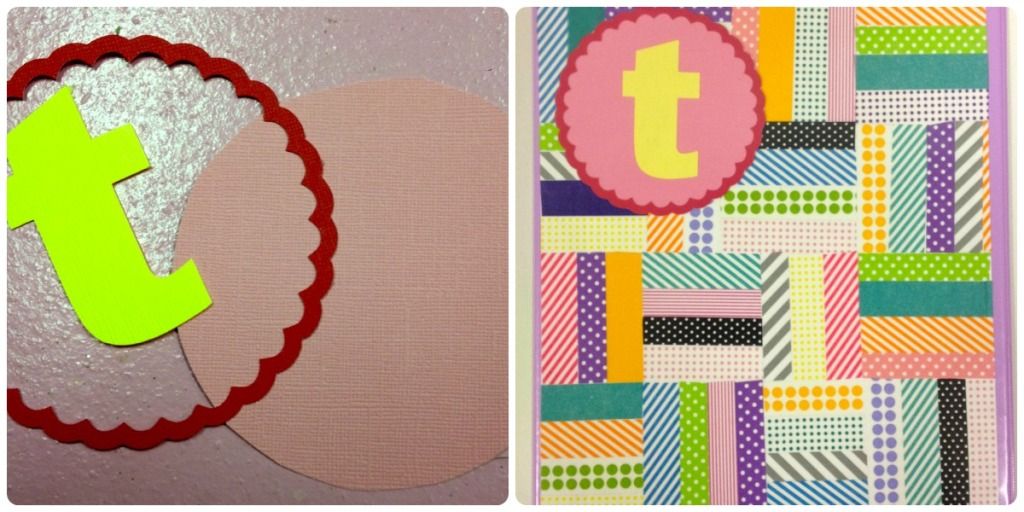
2) Once you know how much space you need to cover, start applying your Washi tape in any pattern you want. It would have been MUCH easier if I just ran lines across the whole piece of paper, but instead I chose to take this patchwork design on. Use your scissors and X-ACTO knife to keep your lines straight. 
3) After your whole piece of paper is covered in Washi tape, personalize it with your child's name or initials. I cut a circle, border and the letter "t" out using my dye-cut machine. I used a glue stick to attach the pieces together. You can use pre-made letter stickers, or ask me for some personalization of your own! 
4) Slide your piece of Washi covered paper into the clear front cover of the binder and you're done! 

Personalizing day planners & pencil boxes:


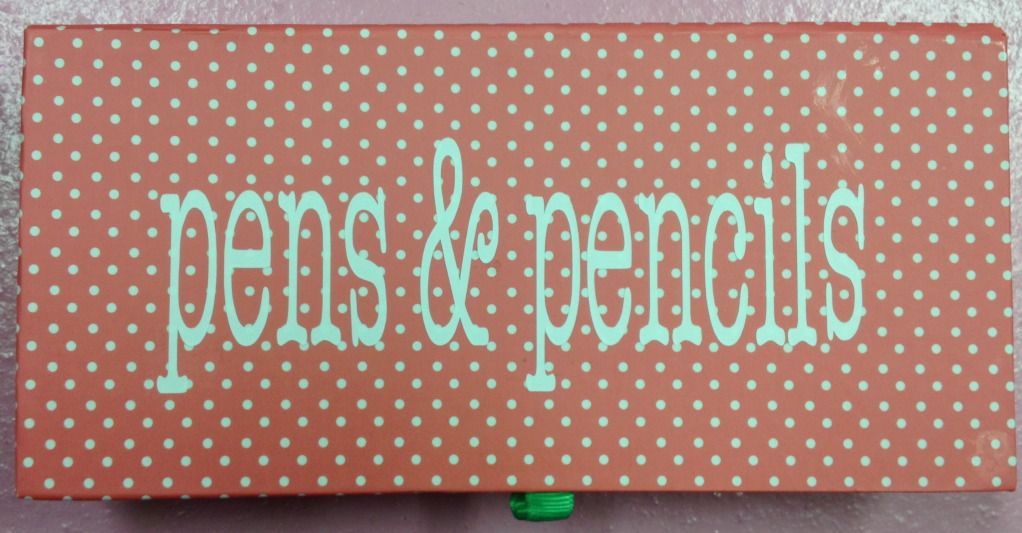
I found this day planner and pencil box at Target. The pencil box is from the dollar section and is supposed to hold money for a lemonade stand, but it works! 

All I did to decorate these items was print out some words on my dye-cut machine and applied them using transfer paper. 

Now for my present to you! 


My goal today was to inspire you to decorate plain ol' school supplies using adhesive vinyl. If you don'y have a dye-cut machine, this entire post usually would be totally pointless for you. NOT ANYMORE!! Come visit me over at Measure Once, Cut Twice {The Shop} and I'll print off any 12" x 12" sheet of vinyl you want for only $4.50 per sheet (or only $.03 per sq. inch!).

Not only can you get $5 off a $30 purchase through July 31st, but you'll get 10% off your first purchase AND you can use promo code: StuffILove to get an extra 10% off!! That makes it totally worth stopping by, right?

Thanks for getting through this extra long post today. Be sure to come back and visit Cat daily to keep up with her amazing blog!  Oh, and please stop by Measure Once, Cut Twice and say hi. I'd love to meet you :)


Tuesday, July 24, 2012

Outdoor Water Gardens

Hi everyone! I'm Vidya from Whats Ur Home Story, where I blog about how my family of four is adding character and style to our cookie cutter home with easy on the budget, no hard core DIYing, and no major renovation projects. I am so thrilled to guest post on Stuff I Love for the very talented Cat. Lately I've been called the ‘water garden’ lady so many times that I thought I would share my container water garden project with you. Even if you are short on outdoor space you can have one as long as you have a sunny spot. I have it on my deck.
DIY Container Water Garden
Here is how you go about it:
  • A medium to large size container works best. I used a plastic wine barrel planter.
  • To add interest choose plants with different visual heights. Use marginals like canna lilies, dwarf papyrus, taro for height. The water lilies or lotuses of course. Their leaves will cover much of the water surface from sunlight preventing algae growth. Don’t forget the floaters; water hyacinth, water lettuce. You could add cascading plants like water mint too that would fall over the container’s edge. I didn’t add it to mine as I felt that my container was already getting pretty crowded.
  • In order to prevent it from becoming a mosquito breeding haven, you'd need one of the following; a pond pump kit (I tried using an aquarium kit, didn't work) or mosquito dunks or fish.
  • I ended up choosing the third option, 3 $0.25 mollies from Walmart.
container water garden tutorial
  • Plant your marginals and lilies in pots that will fit into the container. You can add some height to your lilies by placing the pots on rocks. You've to use garden soil not the peat mossy kind to plant or else the soil will just float on the water. I skimped on buying aquatic fertilizer and just added some Miracle-Gro to my soil.
  • Add some rocks as the top layer in your pots. Again to stop the soil from floating to the top.
  • Arrange the pots in the container. Add water, your floaters, and your mosquito dunk.
  • If you are adding fish, wait for 2-3 days so that the chlorine in the water settles down/ evaporates.
  • Now you are good to go! Wait patiently for your plants to fill out. Soon you'll get to enjoy these beauties.
water garden tutorial 
Maintenance wise, if you have fish then you'd need to change the water maybe once in 10 days. When you change the water, make sure to pour 1/3rd of the old water back into the garden so the fish do not get water change shock. You can feed the fish once in 2 days. The algae was not at all a problem once I added the fish. If you are using only the mosquito dunk then you will have to clean the container every time you change the water too. Hope I've inspired y'all to give it a shot too.

Friday, July 13, 2012

Shape Up!

It's time to introduce to you another one of my fantastic XL Sponsors!  Today Megan from Shaping Up To Be A Mom is here to tell you a little more about herself.  Take it away, Megan!


1) What is the name of your blog


2) How did you come up with the name?

I started the blog back in August of 2008, when I was 9 months pregnant with my first baby. I wanted to use my blog as a way to stay motivated and accountable as I worked to lose the baby weight. Four years later, I write about all aspects of my life, and how I'm trying to "shape up" and be the best I can be!

3) Tell us a little about you.

I was born and raised in southern Maine, and I attended college at the University of New Hampshire. I graduated with a BA in Theatre (emphases in Musical Theatre and Theatre Education) when I was 20 years old, which sounds like I graduated two years early, but it was only one year early. I turned 21 two days later! I met my husband in the summer of 2004 when we were working as theme park entertainers, and we got engaged that New Year's Eve. After another summer of performing (2005), I moved to Arizona, where he was from, and we were married on October 29th, 2005, in the Mesa LDS Temple. Now we live in his hometown, a little south of Tucson, where he took over his old high school music teacher's job. We bought a house in 2009, and I have had so much fun painting and decorating each room! We have two kids, Carter who is almost four, and Vanessa who is 17 months, and we are hoping to add a third in the near-ish future! I'm a mostly SAHM, though I do work part time for my dad's software company, and I often take freelance directing and choreography jobs with local schools and theatre companies.


4) Do you have a shop?

I do! I am a stylist for Cents of Style, so I get to sell all their adorable shoes, handbags, jewelry, and other accessories! We have the cutest accessories for the best prices! You can find the website here, but I would also love it if you would "like" my Megan's Cents of Style Facebook page, to stay updated with all the latest products and sales! You can get 10% off your entire order (and shipping is free!) with my coupon code "0512." Make sure to enter it at checkout and hit "apply coupon!" Want to get some jewelry for free?! Ask me about hosting a party!


5) What is your favorite summer activity?

Well, this summer I am working not-quite-full-time, to make some extra money, while my husband is home with the kids. It has been a really nice break from staying home with the kids all day, but come August, I will be ready to switch back! Other than that, I love the beach! I grew up about a mile away from the beach in Maine, and we spent almost every summer day there. Now we take lots of beachy vacations!


6) What is your best memory about high school?

My senior year I finally scored a lead in the school musical. I played the Baker's Wife in Into The Woods. It was so much fun!


7) What is one thing you wish you could tell other bloggers?

Post your giveaway winners as soon as the giveaway ends! I never know if the blogger will email or not, so I check back often, and sometimes days and weeks go by without the winner being posted. Also, I love you guys! ;)

8) Are you working on any special projects right now?

On the 1st of every month, I host the A Look Back link-up, where we write about one year from the past. August 1st will be 1986, September 1st is 1987, etc. When everyone links up, we have this wonderful treasury of memories from that year, from all different kinds of people in all different places!


I'm also working on launching a brand-new shop, called Pages from the Past. I'll give you a hint; it has to do with vintage literature and home decor. ;) Follow my blog so you won't miss the grand opening!

9) Social Media Links


Thanks for having me!


Wednesday, February 8, 2012

Guest Post by Christina Johnson

Today we have a guest poster who is here to tell you about fun ways to vacation as a family. Take it away, Christina!
 ___________________________________________________________

Explore New Areas as a Family
Article submitted by Christina Johnson

The inexpensive camping trips are getting old with your family. You dread the sighs and complaints, when you suggest a week-long visit to Uncle Harry’s farm again this year. What you need are some really unique and fun family vacation ideas to make you a hero this year.

Old West
You would be hard pressed to find any family member that wouldn’t be excited about visiting the old west. Plan a road trip with stops to explore ghost towns and pan for gold. A visit to Tombstone, Arizona offers the site of the Ok Corral. Watch a reenactment of the most famous gunfight of the west. Walk along the same street that Wyatt Earp and Doc Holliday walked. Visit a saloon where they may have sidled up to the bar for a beer or whiskey. Visit the museum of the oldest Arizona newspaper, reading the original reported article of the gunfight. While you are in the area, drive over to Total Wreck, Rosemont and Greaterville, three close-by ghost towns.

Houseboat
Your family loves the water trips you’ve planned in the past, but the saltwater taffy treat at the beach has been worn to a frazzle. Rent a houseboat. Your family will enjoy all the comforts of home, but will also enjoy the adventure of living right on the water. Take the family drifting down the Mississippi, just like Huck Fin. Stop at an island and explore. Enjoy the beautiful scenery, while vacationing on a houseboat on Shasta Lake in Northern California.

Volunteering
There couldn’t be a better vacation idea than teaching your children about giving to others or offering benefit to Mother Nature. The kids may squawk at first, when you present the idea, but by the end of the week they will realize how volunteering is a two way street. Helping others is as rewarding as it is to those receiving the help. Of course, you will have to plan your volunteer vacation according to the ages and abilities of all family members. The Sierra Club offers about 90 different service trips, such as cleaning up trails. Habitat for Humanity is an organization most have heard of. Help with building a family’s home. Hoops for Hope is a 3-on-3 basketball tournament that raises money for worthy causes. Stay close to home this year and involve your family in setting up a Hoops for Hope tournament right in your own home town.

Christina Johnson who works remotely for Elliman Prudential in the New York City Rentals market.  She is using her journalism major to combine what she loves most, writing and her career. Her specialties include home decor design and DIY home improvement projects.


Stuff I LoveFacebookTwitterPinterestBloglovin
Related Posts Plugin for WordPress, Blogger...